This is the continuous integration build, it is not an authorized publication, and may be broken or incomplete at times. Refer to the Directory of published versions for stable versions
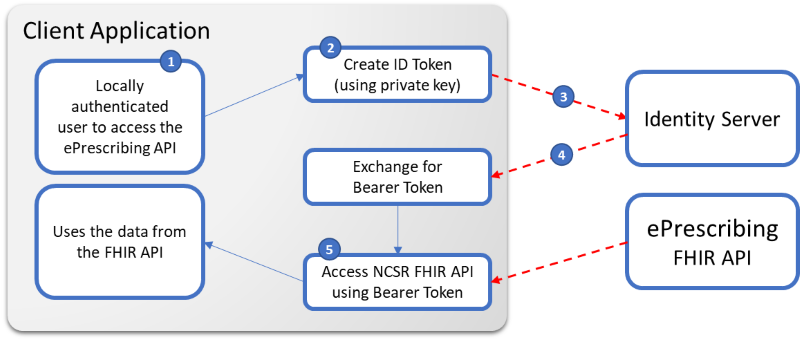
This section will expand on how to:
- Create an Identity Token
- Exchange the Identity Token for an Access Token
- Use the Access Token to call the FHIR APIs
Client Application Requirements
In order to access the ePrescribing FHIR APIs a client application will require:
Client ID&Client Secret(provided by erx/medisecure)- A public key registered with the ePrescribing system (if not using their already registered PES digital certificate)
- The
IssuerURL allocated to your of the Identity Software (not installation, is associated with the public/private key) - The URL of the IdentityServer and FHIR Servers (provided by erx/medisecure)
Note: these values are different for all our environments; development, testing and production, ensuring safety of only accessing the appropriate systems by the approved software/systems
2. Create an Identity Token
JWT Token Fields (ePrescribing)
| Property | Description |
|---|---|
| sub | Subject/ID (this is the ID that we may use in the audit logs combined with your client application ID) |
| name | Name of the User (this is what we may store in our access Audit logs) |
| iss | The Issuer value for the Client Software (not installation, is associated with the clientid/secret/public key)e.g. https://oridashi.com.au/hiasobi |
| aud | The URL of the resource server you are requesting access to e.g. https://epsb.medicationknowledge.com.au |
| exp | Expiry time for the token (ticks/epoch time) |
| jti | A unique identifier for the Token created (can be a new GUID) |
| iat | Token created at this time (ticks/epoch time) |
| nbf | Token not to be used before this time (ticks/epoch time) |
| pesUniqueId | The PES Site ID that’s making the requestThe PES Site ID that’s making the request |
| pesType | The PES Type that’s making the request. The Source System making the request such as “eRx” or “MDS” |
Example JWT Token
{
    "sub": "5124352q",
    "name": "Curt, Jonathan Mr",
    "iss": "Best Practice v15.2",
    "aud": "https://epsb.medicationknowledge.com.au",
    "exp": 1595334277,
    "jti": "{c34f3aba-7bc6-4bf2-8d03-0347c5f9db22}",
    "iat": 1595330617,
    "nbf": 1595330617,
    "pesType": "eRx"
}
When this is encoded into a JWT(Identity Token) and signed it will look like this:
eyJhbGciOiJSUzI1NiIsInR5cCI6IkpXVCJ9.eyJzdWIiOiI1MTI0MzUycSIsIm5hbWUiOiJDdXJ0LCBKb25hdGhhbiBNciIsImlzcyI6IkJlc3QgUHJhY3RpY2UgdjE1LjIiLCJhdWQiOiJodHRwczovL2ZoaXIubWVkaWNhdGlvbmtub3dsZWRnZS5jb20uYXUiLCJleHAiOjE1OTUzMzQyNzcsImp0aSI6IntjMzRmM2FiYS03YmM2LTRiZjItOGQwMy0wMzQ3YzVmOWRiMjJ9IiwiaWF0IjoxNTk1MzMwNjE3LCJuYmYiOjE1OTUzMzA2MTd9.AR6opOJpzV5QP5DPQF7VZExBmbuVe5lqNyhs_FZHs1M9rUzS8hmJK3kZfjiyBGdXGxnSV9ANPfM-HsMfyTtcGexDsaYaJKlMglwzC8yBQDLOA4zwylf-5-4uEYI54RTPkwwTosWjLK9B7rsJbt52Fj8gacRTwr5xcZQWzevRnjxgtBGgJml50Ty3EkhEc4ElC1hzEwzi7zIIiuFtl_l9USPQFQmFpgYS56hQ-Uw37BnUI9SNGWiCM6hhAJ3FvIZNUYxIpWyULY6TYd_rRxfFk7qgiUlRZodhvd-cAlklhLvsipSS5LcdHyJmdm-h_0ylLm7BzcFs3xwWoxnVpuRdiw
Note: You can use a website like https://jwt.io/ to verify the content of your JWT
Most development platforms have components to encode and sign the Identity Token (JWT) that you create to then be used in the Token Exchange.
With the dotnet platform internally we use the jose-jwt package:
<package id="jose-jwt" version="2.5.0" />
JWT Token Fields (MySL Patient applications)
When you connect to the MySL Service, there are some additional properties that are required to go into the JWT to correctly identify the patient
| Property | Description |
|---|---|
| activationcode | The patient’s activation code that was sent to their registered mobile phone or email address (patient to provide this) |
| patient | The patient’s identifier in their MySL record (received after processing the activation code) |
| telephone | The patient’s phone number registered in their MySL record (patient to provide this) - only very restricted client application types will be able to use this property |
3 Exchange the Identity Token for an Access Token
POST: [base]/connect/token
Content-Type: application/x-www-form-urlencoded
Accept: application/json
Ocp-Apim-Subscription-Key: xxxxx
Note: As part of the API request, the Subscription Key to be passed in the header as “Ocp-Apim-Subscription-Key”
HttpClient _client=new HttpClient();
client.DefaultRequestHeaders.Add("Ocp-Apim-Subscription-Key", "xxxxx");
3.1 Request Payload for MySL Dispense/Clinical Vendors
For an Organization i.e. a site (Pharmacy/Clinic/Doctor) wanting to access MySL APIs, the Vendor needs to provide the respective site’s unique PES (Prescription Exchange System) ID issued by the respective PES. (Payload for generating an Organizational Identity Token in dotnet):
Payload:
sub = "medtech\\example\\uid", // replace with your own ID generation (less than 127 chars)
iss = issuer,
aud = "https://mysl.medicationknowledge.com.au",
exp = creationTime.AddDays(2).ToUnixTime(),
jti = Guid.NewGuid().ToString("b"),
iat = creationTime.AddMinutes(-1).ToUnixTime(),
nbf = creationTime.AddMinutes(-1).ToUnixTime(),
pesType = "eRx",
pesUniqueId = SiteID
As part of the API request, certificate thumbprint of the site’s certificate needs to be passed as header with key: “X-SSL-CERT” and value as Base64string as show below(MySL uses this to decode the JWT and validate the PES Site ID and the Certificate Thumbprint internally against the PES)
X-SSL-CERT generation code for Organization Token:

var cert = new X509Certificate2("certificate in byte[] format", "certificate password");// Provide the NASH Digital Certificate (with Private Key)
var certBytes = cert.Export(X509ContentType.Cert);
var certPublic = new X509Certificate2(certBytes);
var publicKey = Convert.ToBase64String(UTF8Encoding.UTF8.GetBytes("-----BEGIN CERTIFICATE-----\r\n" + Convert.ToBase64String(certPublic.GetRawCertData()) + "\r\n-----END CERTIFICATE-----"));
Generating subject token with PES certificates code for Organization Token:
X509Certificate2 cert = new X509Certificate2("certificate in byte[] format", "certificate password");// Provide the NASH Digital Certificate (with Private Key)
// Now generate the Identity Token
string subjectToken = Jose.JWT.Encode(payload, cert.GetRSAPrivateKey(), Jose.JwsAlgorithm.RS256);
3.2 Request Payload for ePrescribing API Mobile Intermediaries
The scenario explains the Authentication request for Mobile Intermediaries who are looking to access the ePrescribing API for Patient App requests. (Payload for generating an ePrescribing API Mobile Intermediaries Identity Token in dotnet) :
Payload:
sub = "medtech\\example\\uid", // replace with your own ID generation (less than 127 chars)
iss = issuer,
aud = "https://mysl.medicationknowledge.com.au",
exp = creationTime.AddDays(2).ToUnixTime(),
jti = Guid.NewGuid().ToString("b"),
iat = creationTime.AddMinutes(-1).ToUnixTime(),
nbf = creationTime.AddMinutes(-1).ToUnixTime(),
Generating subject token with RSA Private Key for mobile intermediary:
RSA rsa = new RSACryptoServiceProvider(2048);
rsa.ExportPkcs8PrivateKey();
rsa.FromXmlString(<<rsa Private Key>>);
string subjectToken = Jose.JWT.Encode(payload, rsa, Jose.JwsAlgorithm.RS256);
Request Body: (Form URL encoded content)
GrantType = "urn:ietf:params:oauth:grant-type:token-exchange"
SubjectToken = "<...signed token generated as above...>",
SubjectTokenType = "urn:ietf:params:oauth:token-type:jwt",
ClientId = "<...Application's unique Client ID...>",
ClientSecret = "<...Application's Client Secret...>",
Scope = "patient/MedicationRequest.read"
Note: You will only be able to request scopes that your client application is registered to have access to, otherwise the token exchange will be rejected.
3.3 Request Payload for MySL Mobile Intermediaries
3.3.1 MySL - Mobile Intermediary - Patient Activation and linking to View MySL
This scenario describes the request for Activating a Patient in MySL for using Patient App. As this scenario is part of the authentication itself, the Mobile Intermediary need to provide required details for Activation along with Authentication Request.
Mobile Intermediary needs to provide Patient Activation Code along with the patient demography including Patient first name, last name and DOB when sending the Authentication request. Once these details are validated, access token is returned back to the Mobile Intermediary along with the unique Patient Id.
Mobile Intermediary will persist this Patient ID against the Patient Profile, at their end and will use the same for subsequent Authentication requests to view that specific Patient’s MySL: (Payload for generating an Mobile Application Identity Token in dotnet)
Payload:
sub = "medtech\\example\\uid", // replace with your own ID generation (less than 127 chars)
iss = issuer,
aud = "https://mysl.medicationknowledge.com.au",
exp = creationTime.AddDays(2).ToUnixTime(),
jti = Guid.NewGuid().ToString("b"),
iat = creationTime.AddMinutes(-1).ToUnixTime(),
nbf = creationTime.AddMinutes(-1).ToUnixTime(),
p_actcode = activationCode,
client_type="MI",
p_lastname =lastName,
p_firstname=firstName,
p_dob=dob
3.3.2 MySL - Mobile Intermediary - Authentication Request for an Activated Patient
For an Activated Patient, i.e. where the Mobile Intermediary has the unique Patient ID provided by MySL, the Mobile Intermediary needs to provide the Patient ID as part of the Authentication request. As part of the authentication, the Identity server validates this patient Id along with the Mobile Intermediary ID to ensure if the Patient has been already activated for this Intermediary and returns the access token if the record is active: (Payload for generating an Mobile Application Identity Token in dotnet)
Payload:
sub = "medtech\\example\\uid", // replace with your own ID generation (less than 127 chars)
iss = issuer,
aud = "https://mysl.medicationknowledge.com.au",
exp = creationTime.AddDays(2).ToUnixTime(),
jti = Guid.NewGuid().ToString("b"),
iat = creationTime.AddMinutes(-1).ToUnixTime(),
nbf = creationTime.AddMinutes(-1).ToUnixTime(),
client_type = "MI",
patientid = patientId
Example Response:
HTTP 200 OK
Date: Sat, 09 Feb 2013 16:09:50 GMT
Content-Type: application/json; charset=ust-8
Response Body (for a patient’s access token):
{
    "access_token":"sZ0LCBo7_lkGC7SP4od9izw4m0j9xyuz4gJQKqm0Vao",
    "expires_in":3600,
    "token_type":"Bearer",
    "scope":"patient/MedicationRequest.read"
}
Response Body (For an organizational access token):
{
    "access_token":"r-jwNjfabBYMso7rPOYPnQpedMukSlb0_KPQFH-Gv4Y",
    "expires_in":3600,
    "token_type":"Bearer",
    "scope":"user/MedicationRequest.read",
    "organization":"2bfe6cfc38e54b84a4d9efaebabe110b"
}
Response Body (For an TPI access token):
{
    "access_token":"r-jwNjfabBYMso7rPOYPnQpedMukSlb0_KPQFH-Gv4Y",
    "expires_in":3600,
    "token_type":"Bearer",
    "scope":"mysl.patient/MedicationRequest.*",
    "patient":"2bfe6cfc38e54b84a4d9efaebabe110b"
}
Supported Scopes
Not all scopes are available on both FHIR Resource servers, this table describes which scopes are supported. Your Client application will also need to be configured to have access to the data too. Only request access to the resource types that you need access to.
| Identity Context | Scope | Resource Server |
|---|---|---|
| Patient | patient/MedicationRequest.read | ePrescribing API |
| Patient | patient/Patient.read | MySL |
| Patient | patient/Patient.* | MySL |
| Patient | patient/Consent.read | MySL |
| Patient | patient/Consent.* | MySL |
| Patient | patient/Organization.read | MySL |
| Patient | mysl.patient/MedicationRequest.* | MySL |
| Patient | mysl.patient/Patient.* | MySL |
| Patient | mysl.patient/Consent.* | MySL |
| Organization | user/MedicationRequest.read | ePrescribing API & MySL |
| Organization | user/Patient.read | MySL |
| Organization | user/Patient.* | MySL |
| Organization | user/Consent.read | MySL |
| Organization | user/Consent.* | MySL |
| Organization | user/Organization.read | MySL |
| Organization | user/VerificationResult.read | MySL |
| Organization | user/VerificationResult.* | MySL |
| Organization | user/RelatedPerson.* | MySL |
Note: You can use the multiple scopes together Ex: user/MedicationRequest.read patient/Patient.read in the request to get the access token.
4 Use the Access Token to call the ePrescribing FHIR APIs
When calling API operations that need to trace the calling practitioner the bearer token must be provided in the header of the request:
GET: [base]/MedicationRequest?identifier=9777772VVX9TBG747A
Accept: application/fhir+xml
Accept-Encoding: gzip (optional if you want to compress the result returned)
Authentication: bearer sZ0LCBo7_lkGC7SP4od9izw4m0j9xyuz4gJQKqm0Vao
Example Authentication Failure Response:
If the token Authentication fails, then you will receive a http status return 401 with an OperationOutcome that provides additional details on the error that has occurred.
HTTP 401 Unauthorized
Date: Sat, 09 Feb 2013 16:09:50 GMT
Content-Type: application/fhir+xml; charset=ust-8
Response Body:
<OperationOutcome xmlns="http://hl7.org/fhir">
  <issue>
    <severity value="error" />
    <details>
      <text value="Unauthorized Access" />
    </details>
  </issue>
</OperationOutcome>